Hey Blog Buddies,
As promised, I'm sharing the WIPs that followed me home from the recent Nordic Needle Retreat. Here are the classes in order:
To give us an authentic Naversom stitching experience, our teacher (Debi) mounted our fabric onto stretcher bars and then taped a piece of paper over the front! This meant that you had to work the stitching in a sewing motion rather than stabbing the needle from one side of the fabric to the other. It also meant that you couldn't put your non-stitching hand behind the fabric to guide the needle to the right place. I soldiered on with the paper in place for about an hour and a half, and then I took it off because I was impatient at the slowness of the stitching. (We were allowed to take the paper off, and most of us did!)
As promised, I'm sharing the WIPs that followed me home from the recent Nordic Needle Retreat. Here are the classes in order:
The Strangest Class...
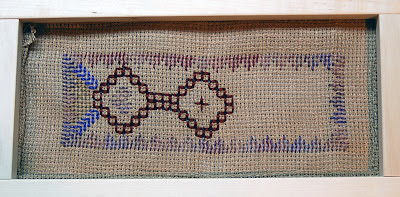
...was the Naversom class. Naversom is a traditional Swedish stitching technique that involved mounting the fabric to a piece of birch bark. The front side of the piece was toward the bark to keep it clean while the stitcher was out in the field tending her animals. Therefore, the entire piece was worked from the back, and the stitcher never saw the front of the piece until she was done stitching. To read more about Naversom, go here.To give us an authentic Naversom stitching experience, our teacher (Debi) mounted our fabric onto stretcher bars and then taped a piece of paper over the front! This meant that you had to work the stitching in a sewing motion rather than stabbing the needle from one side of the fabric to the other. It also meant that you couldn't put your non-stitching hand behind the fabric to guide the needle to the right place. I soldiered on with the paper in place for about an hour and a half, and then I took it off because I was impatient at the slowness of the stitching. (We were allowed to take the paper off, and most of us did!)
Naversom is a pulled and drawn thread technique,
although it doesn't show up too well in this photo.
Debi used a 7-count Klostern fabric as the ground
because it has rather large holes.
This enabled us to skip the step
of removing the threads in the fabric
which we were told would have been
40 hours of prework!
The Most Challenging Class...
...was the blackwork class, for a couple of reasons: going from 7-count fabric to 32-count fabric, and taking a complicated pattern and deconstructing it on the fly. As a matter of fact, I was so slow in this class that I didn't even get to the deconstructing part at all! (For some reason, the thread kept coming out of my needle. I must have threaded the needle 20 times if I threaded it once!) But I did appreciate the concept, which can be applied to any blackwork project in the future. Instead of handing us a kit with a pattern, we were made to think about the patterns and how they might look on the fabric and how to shade using just one pattern (sort of "teach me to fish" rather than "give me a fish").We were given a template with an oval to trace.
Then we had to find pictures of heads or other forms
and trace their outlines inside the oval.
(That was our pre-work.)
If you're wondering what type of head
is on the left, it's a dog's head.
I know I will use this technique in
upcoming blackwork projects.
The Most "Fun" Class...
...was the intermediate canvaswork.
My friend Cathy and I both took this class,
and we just had a fun, relaxing time,
giggling all the way through it.
This piece uses a lot of cool threads,
including a fuzzy Rainbow Gallery Very Velvet thread for the border.
The only thing I'm nervous about
are the bullion-stitch roses that go in the corners.
Technique I've Been Meaning to Try for the Longest Time
Huck weaving!
The class was on Sunday morning
and we had to catch an 11:45 flight,
so I had to leave an hour before the class was through,
but here is my start:
The piece will be a bell pull,
as you can see from the photo on the right.
And, yes, you just weave the thread through the fabric.
Monk's Cloth is often used for Huck,
but we were using Aida cloth.
It's a simple but fun technique.
Needless to say, my regular rotation
has gone on a short hiatus.
I'm looking forward to the
International Hermit & Stitch Weekend
which starts on Friday.
I have no clue what I'm going to work on,
but I would like to finish up the Naversom piece
sooner rather than later!
Hope your weekend will be fun-filled.
Thanks, as always, for visiting.


7 comments:
Wow! Great recap. What interesting classes.
ooooo these are all new to me :) good luck with them all and enjoy your hermitting :) love mouse xxxxx
Great variety of techniques you took there! Thanks for sharing not just your WIPs but the commentary on the process for each! Have fun hermitting! =)
What a fun variety of classes. I love how you categorized them. For the bullions, get a millners or straw needle if it didn't come in the kit (let me know if you need once, I have a loads). It makes a world of difference.
thx for sharing. Wow. Looks like you learned A LOT.
I love seeing all these different techniques!!!! The huck stitch looks so interesting.
gorgeous stitching :)
Post a Comment